Miriam was the sister of Moses. We first saw her in the Torah when she placed Moses into the waters of the Nile and hid in the reeds to make sure that he was taken by someone who would take care of him. Later, Miriam is associated with the well that followed B’nei Yisrael (the Children of Israel) as they traveled through the desert. According to the Rabbis, the well that traveled through the desert did so because of the merit of Miriam (Tractate Ta’anit 9a, Rashi on Bemidbar 20:2).
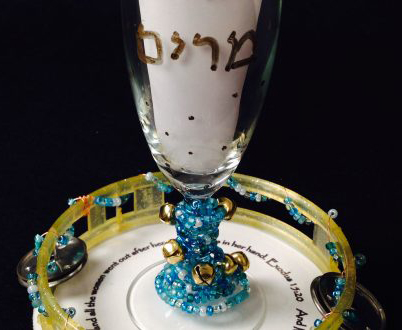
Miriam’s association with water has led to an innovation on the seder table, Miriam’s Cup. This cup, filled with water, is meant to remind seder participants of the important role that women played in the Exodus from Egypt and in B’nei Yisrael’s travels through the desert.
There is no set ritual associated with Miriam’s Cup, but there are particular moments during the seder that have become more common for its use. Some people fill the cup at the beginning of the seder. Others use the cup during times of song to remind participants of how Miriam led the Israelite women in song after crossing the Reed Sea (Shemot 15:20-21). Still others combine Miriam’s Cup with Elijah’s Cup.
Materials:
- 1 glass footed goblet (Dollar Store, IKEA and big box stores are all good sources)
- blue beads, all different shades (representing water)
- small bells (evocative of Miriam’s timbrel)
- craft wire - about 18 inches
- gold and silver paint pens
Instructions
- To begin, string and secure a bell on the end of the 18-inch piece of wire. The bell will serve as a knot, enabling the child to bead easily and without incident. For younger children, buy pony beads or any other beads that are fairly large and have big holes.
- Once the beads and bell have been strung on the wire, twist the wire around the top bead to secure.
- Then wrap the beaded wire around the glass stem to decorate the cup.
- With older children you may want to have them use gold paint pens to write “Miriam’s Cup” on the glass in Hebrew or English.
- For adding the Hebrew, download this template. Have your child tape it inside the glass with the Hebrew visible through the glass so that they can use it as a pattern. In case of mistakes, use cotton balls and rubbing alcohol to remove the paint pen.
Find more resources like this on JTeach.org, an online Jewish teacher resource center, launched in 2014 by the Board of Jewish Education of Metropolitan Chicago to help teachers across the nation gain digital access to our high quality, innovative resources, and projects.

Find an Immersive Jewish Experience for Your Child
From youth groups to summer camps, teen-powered social action to travel programs in Israel and around the world, there is a place for every young person to connect, learn, grow, and have fun.

Find the Right Camp for Your Child!
Fourteen Jewish summer camps to choose from across North America. Find one today!